Overview and key features
The Dwev layout is primarily aimed at writing English and coding in programming languages. However, you can still write in most Western European languages using dead keys for diacritics and other symbols, which have been moved up the top row.
All letters are concentrated on the “home” keys, with precedence given to the ease of typing common sequences instead of focusing only on single letter frequency for the home row1.
The middle columns thus only contain punctuation signs. This ensures that while we can’t eliminate entirely lateral movements into these columns, they only happen in between words, not within.
The most right keys on the home and top rows(dash # and square brackets [] on qwerty) are left unused, as they require quite a stretch from the pinky finger2.
The result is that we’re able to type full words without ever leaving the home keys. This fits well with the way we visualize full words rather than sequences of letters, and the lateral movements feel more natural because they only occur for punctuation.
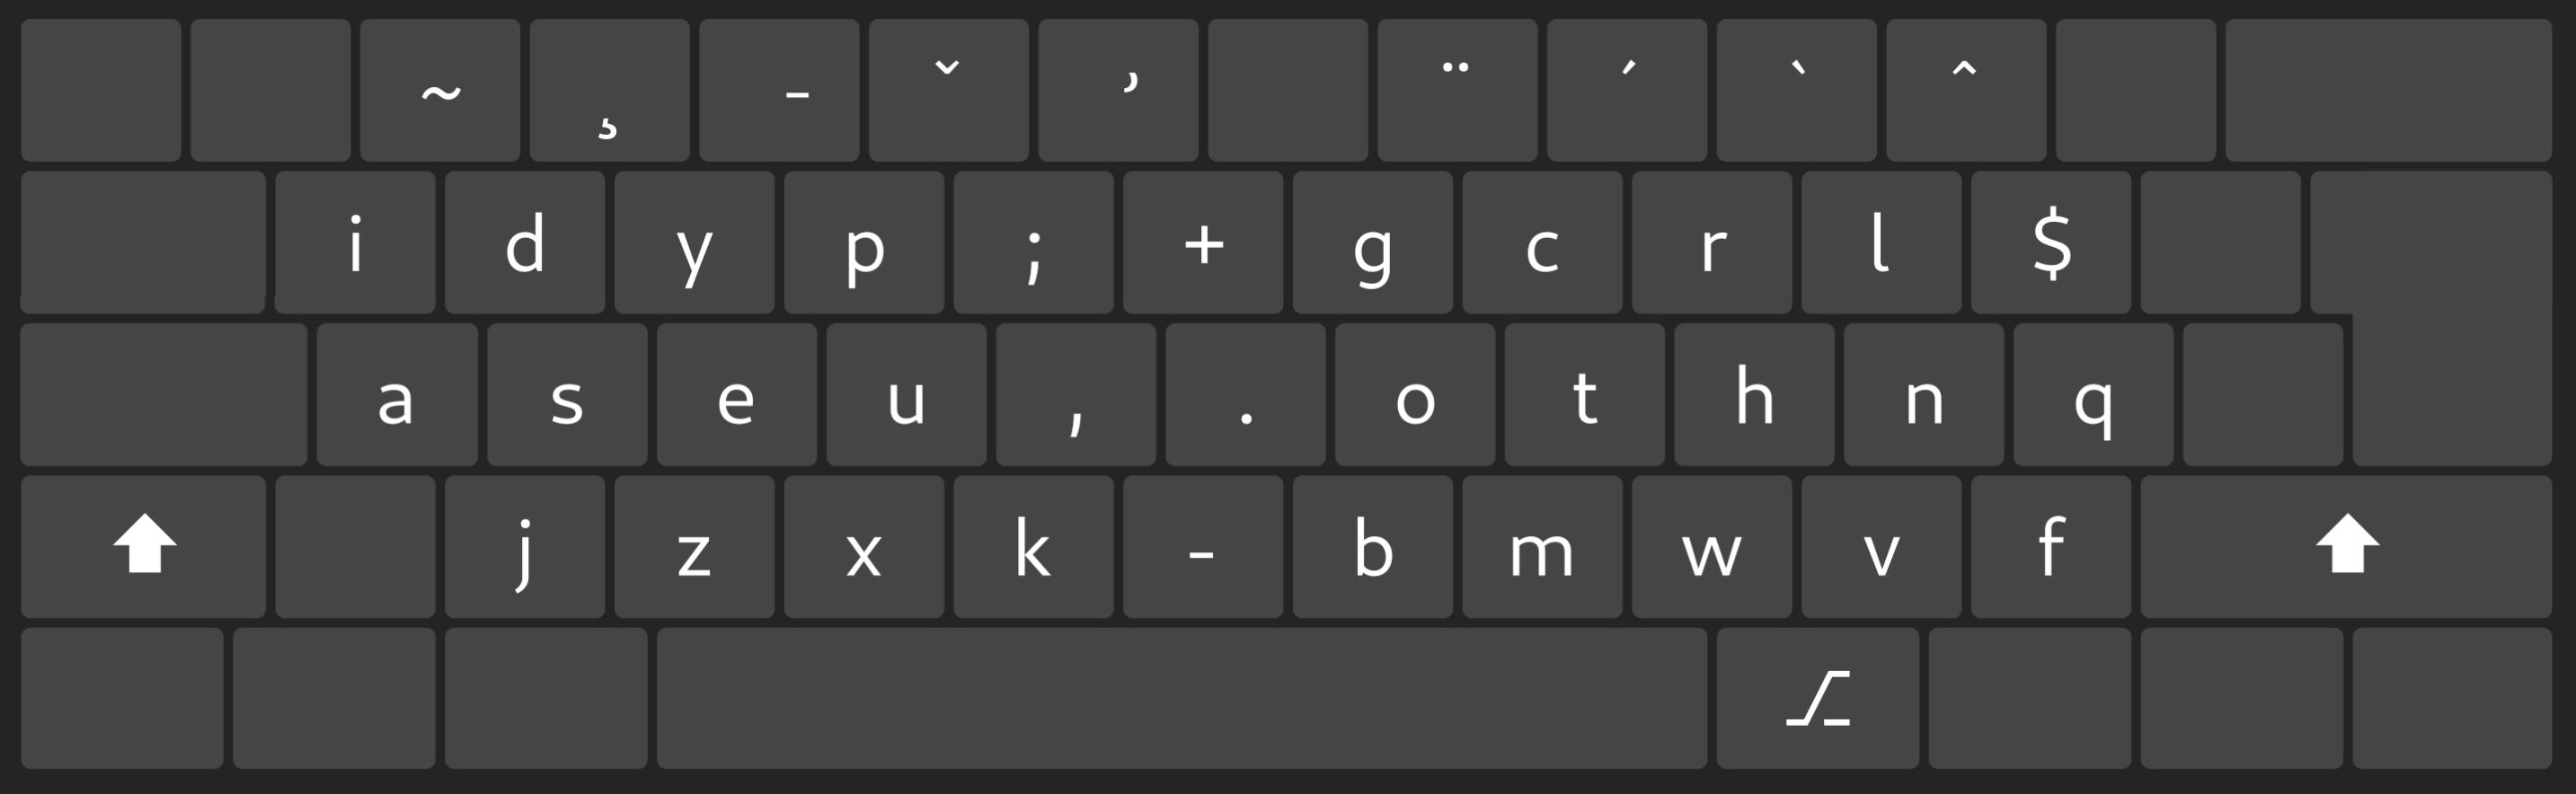
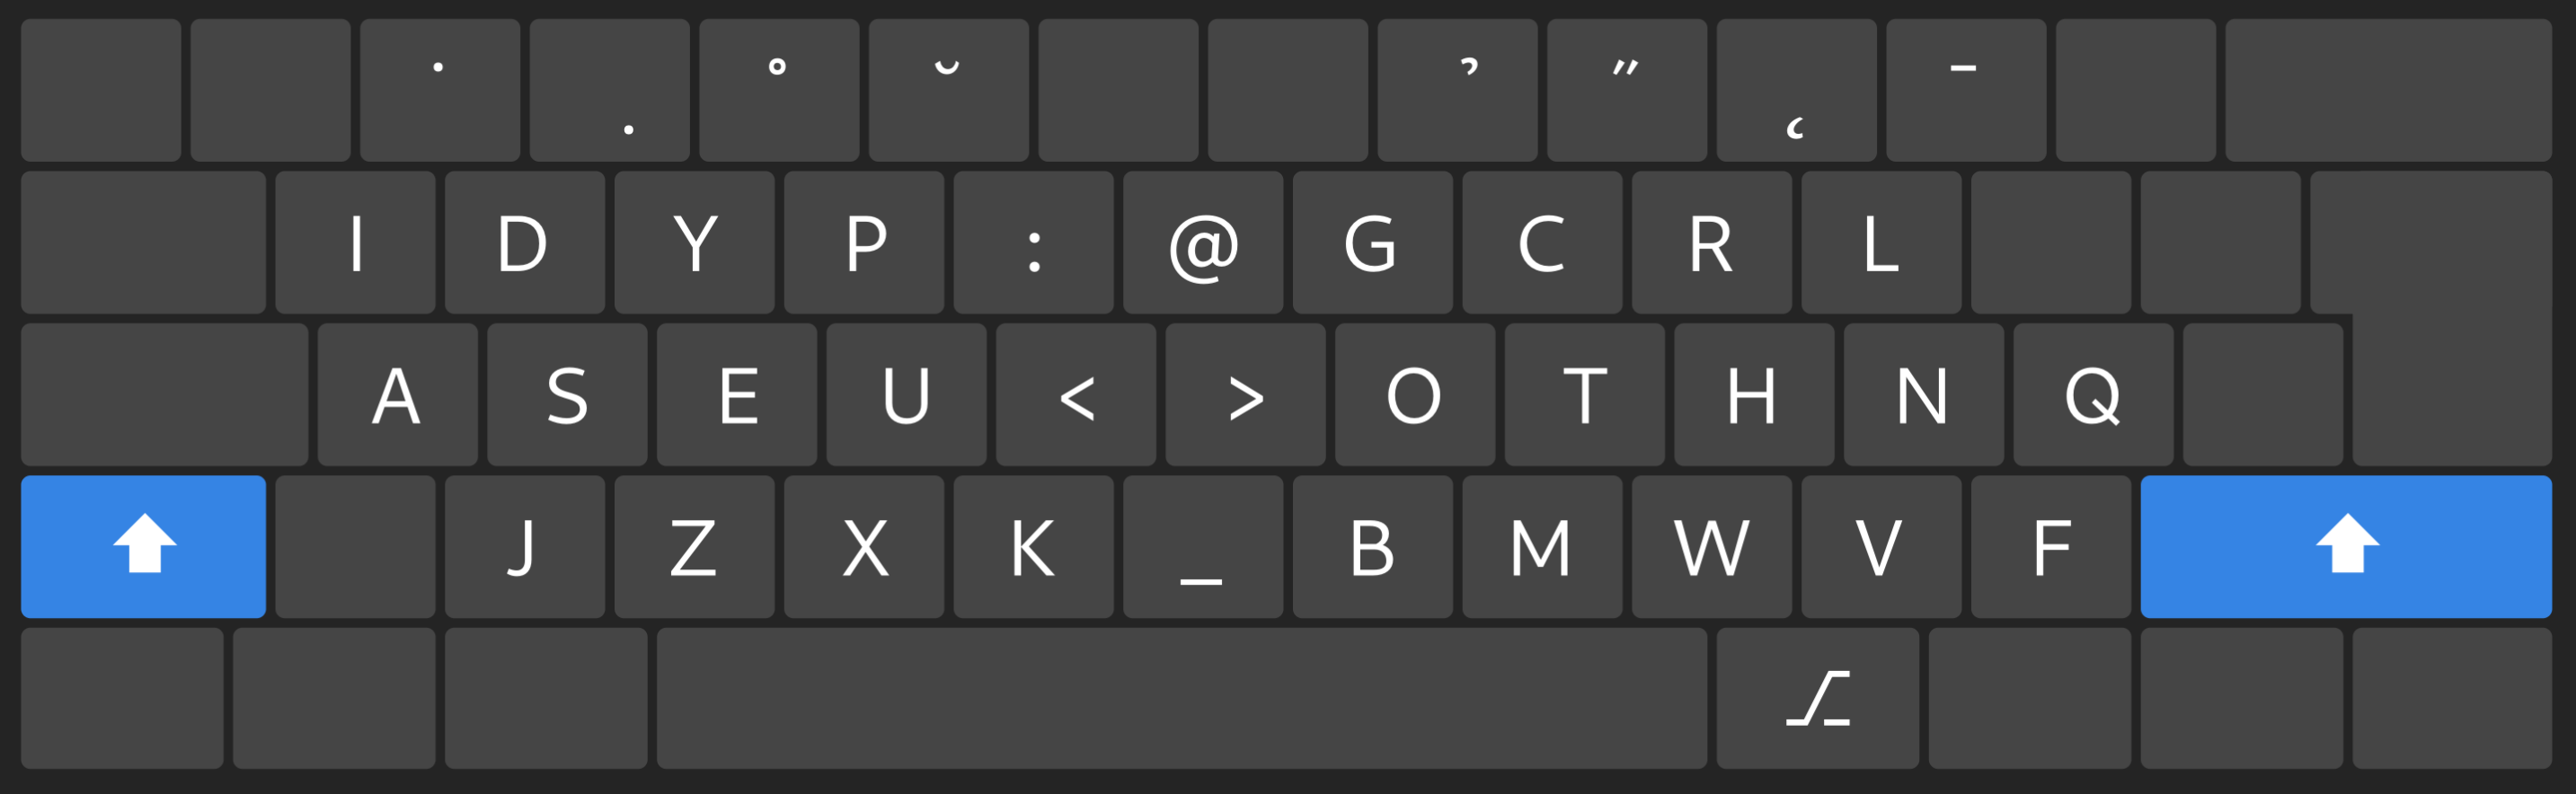
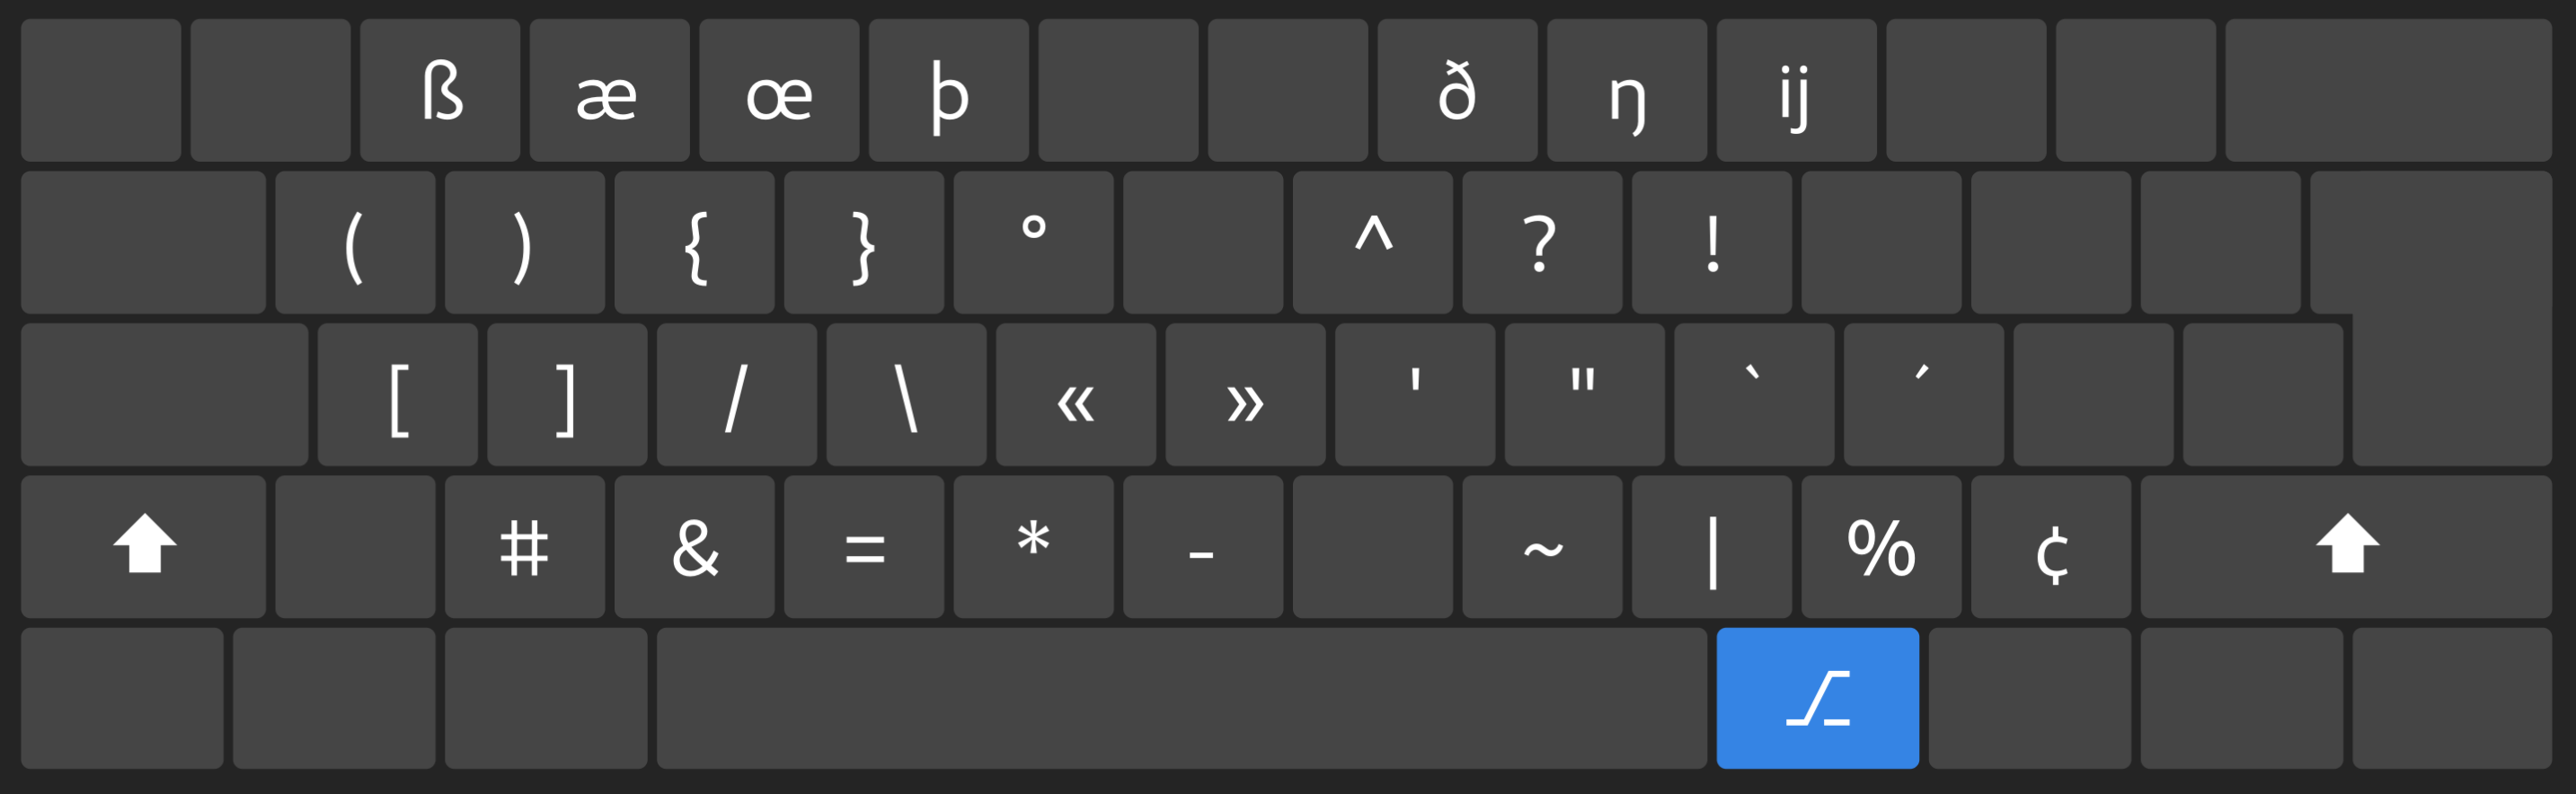
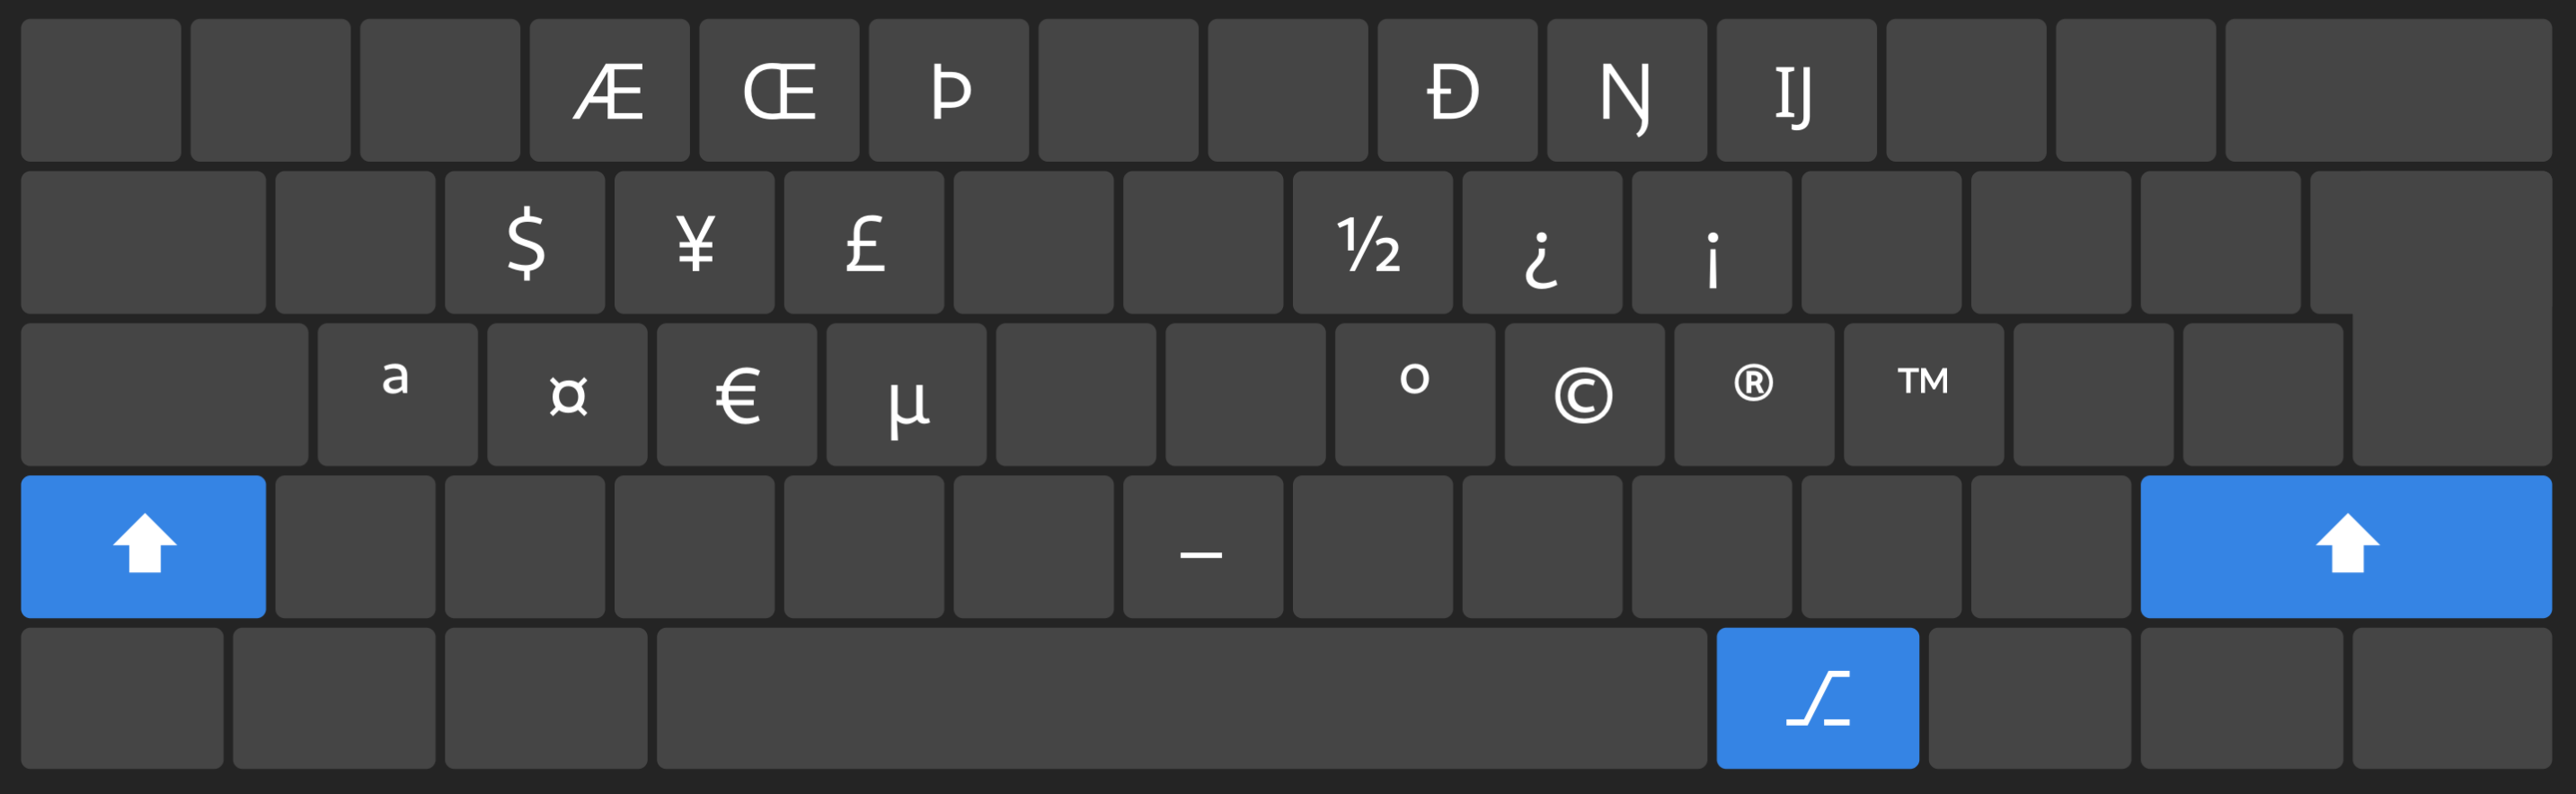
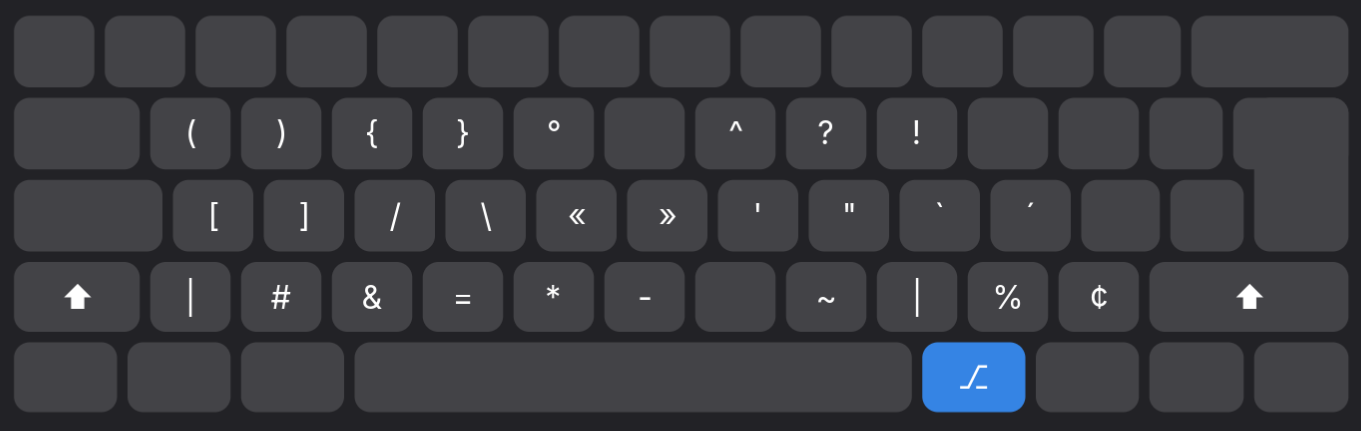
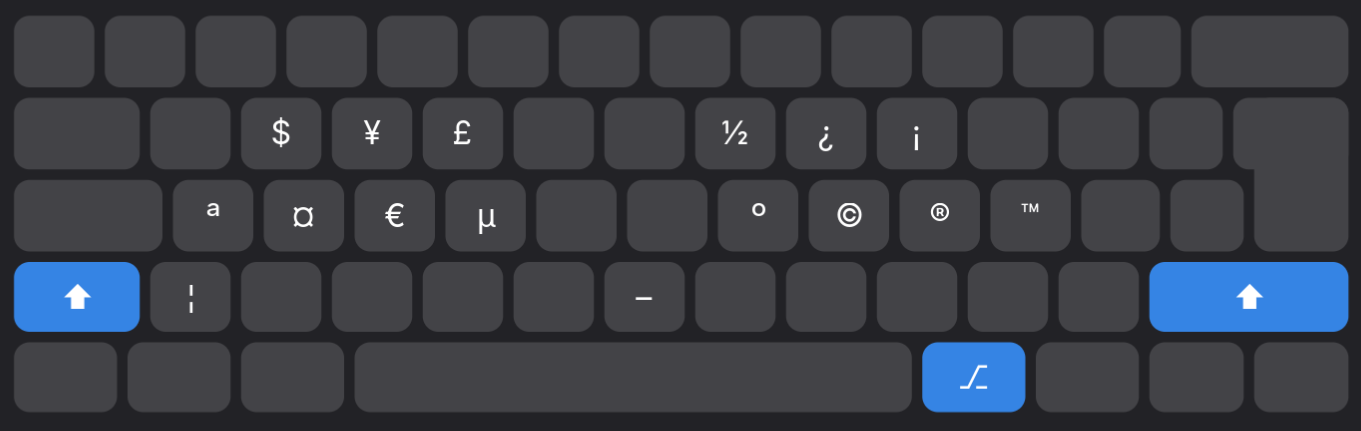
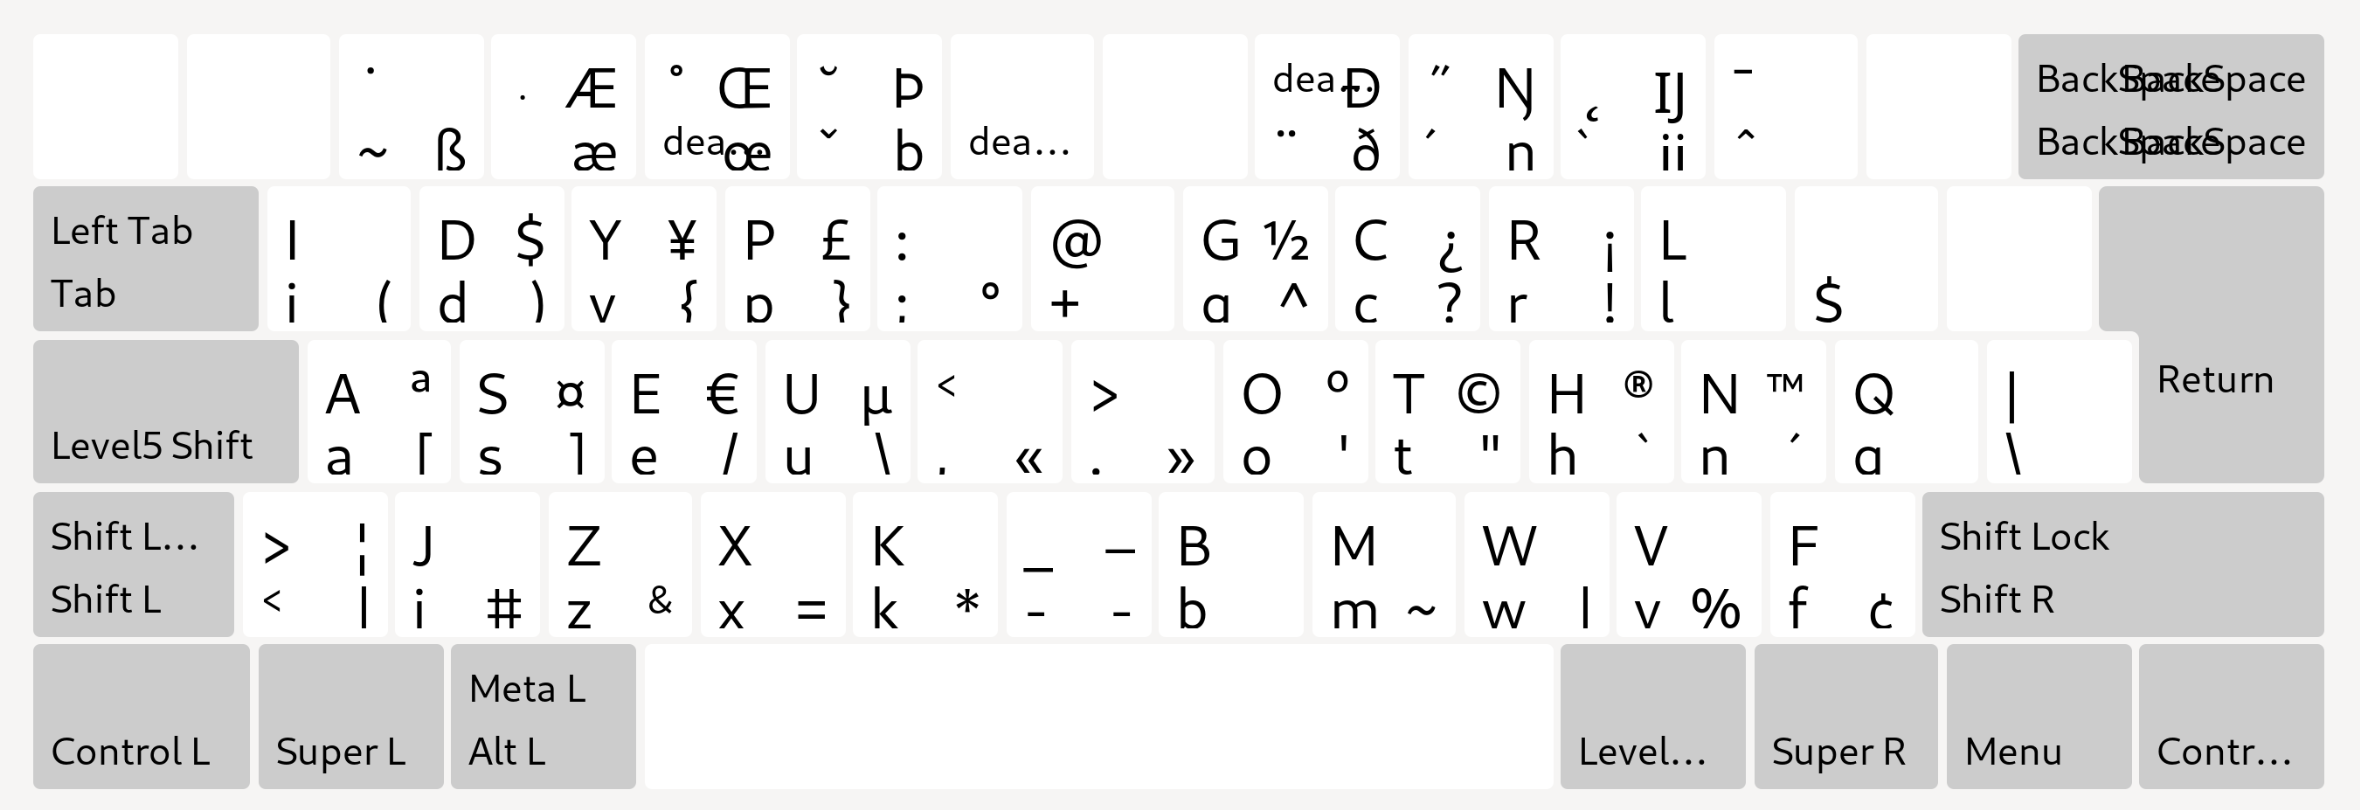
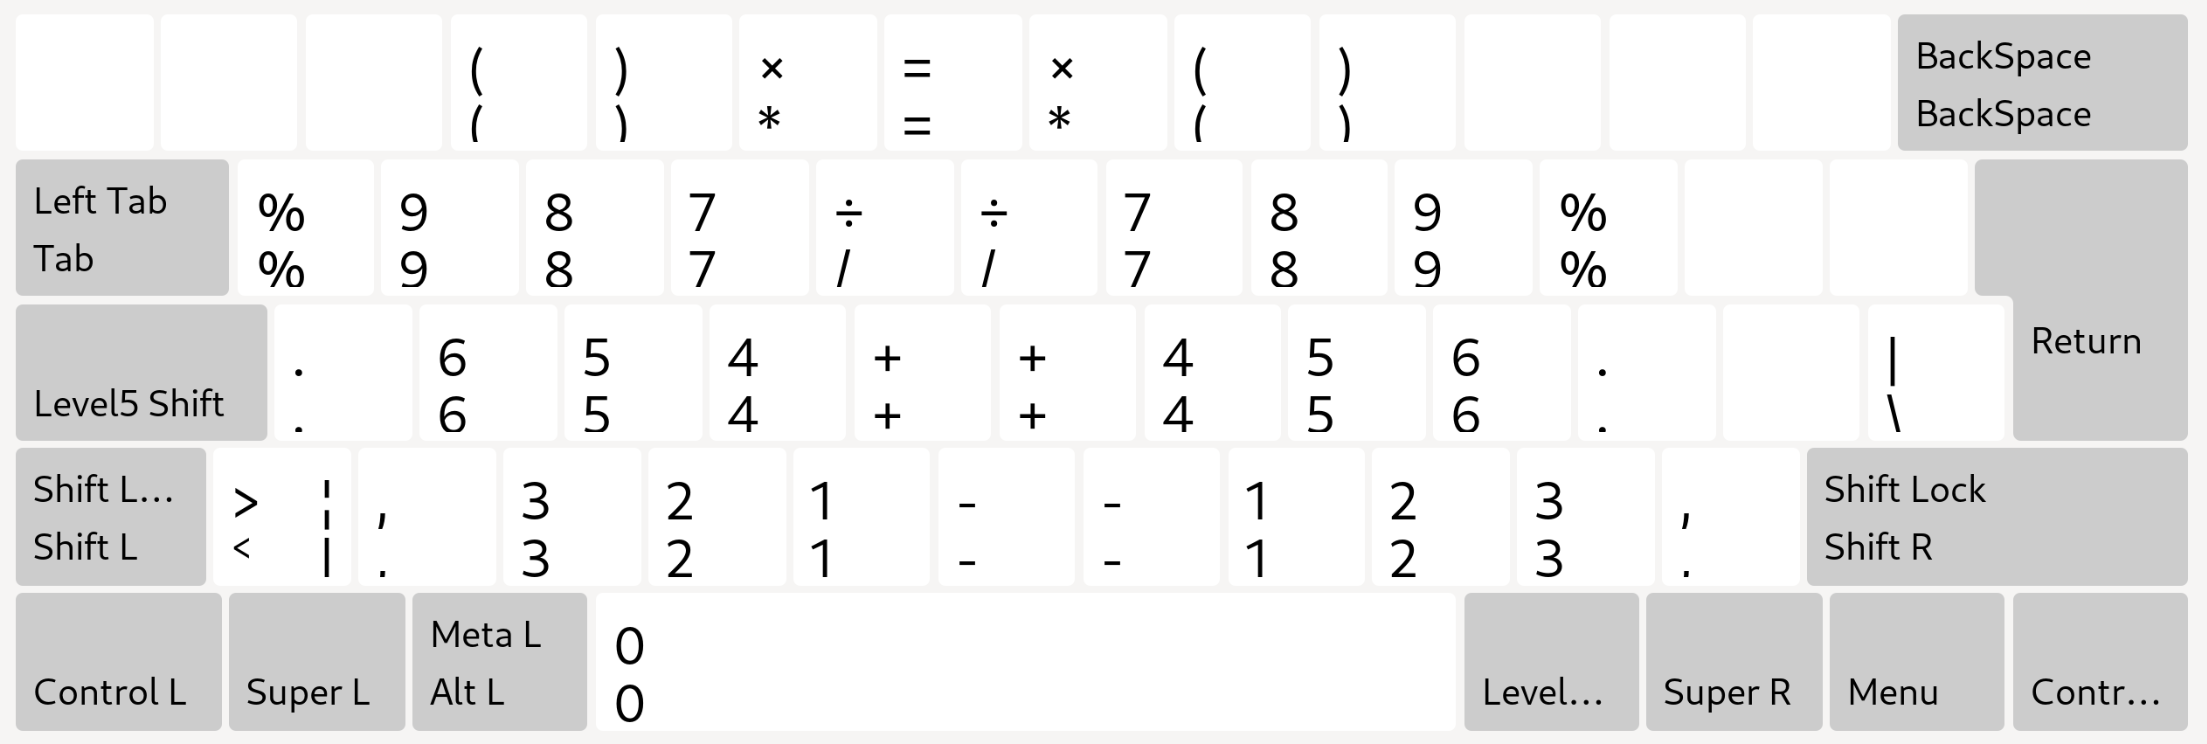
Screenshots
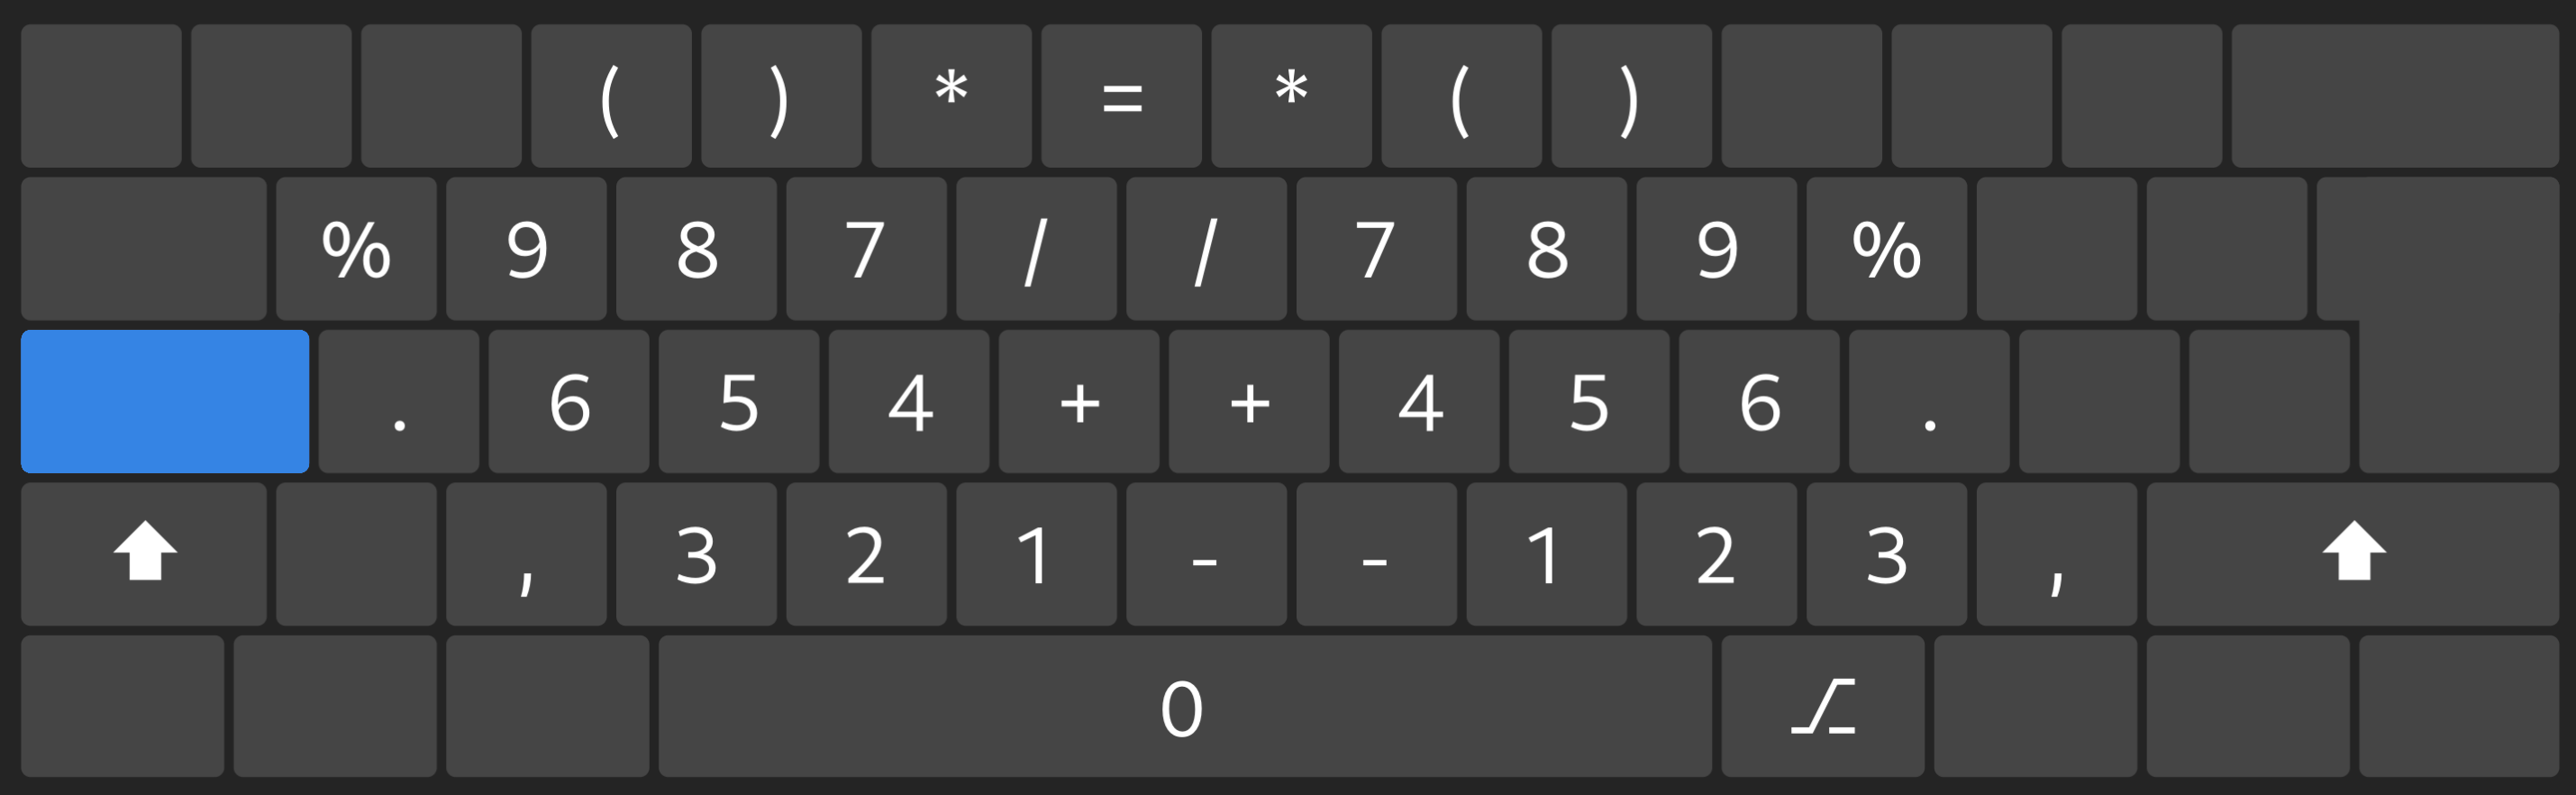
Standard
Level 1
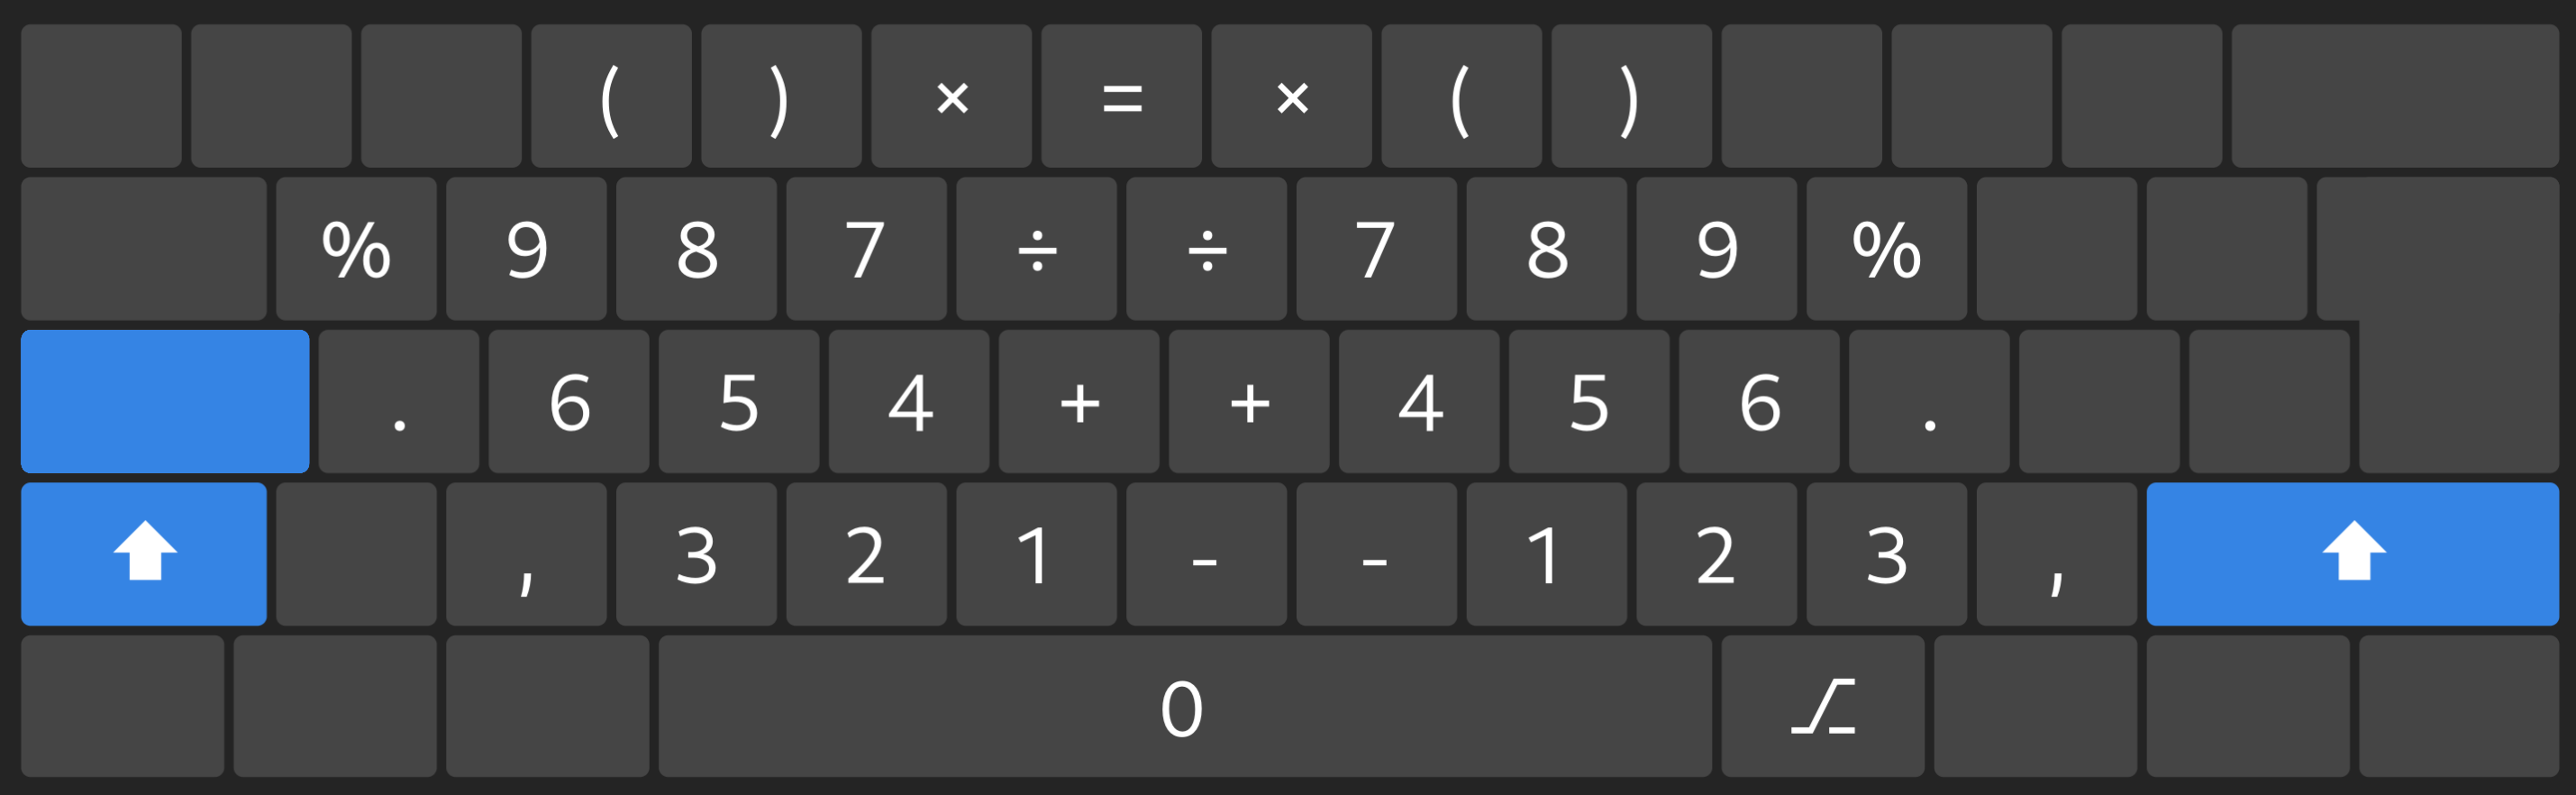
 Level 2
 Level 3
 Level 4
 Level 5
 Level 6
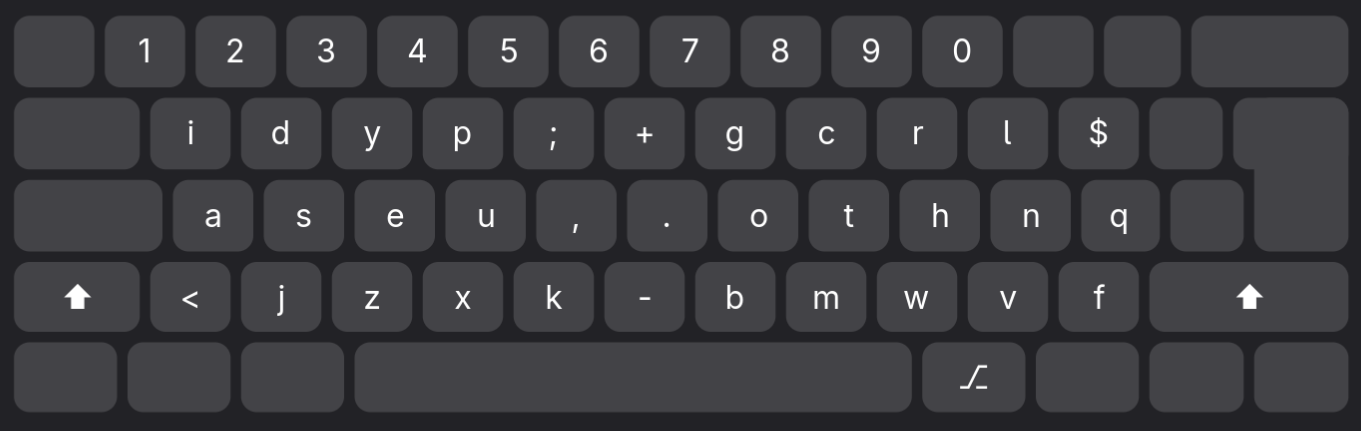
Numeric
Level 1
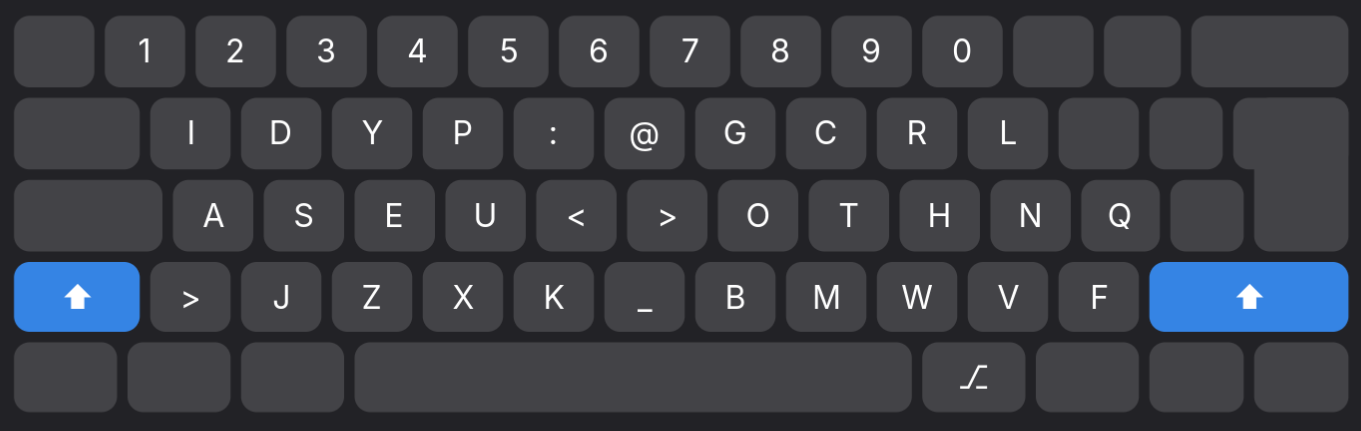
 Level 2
 Level 3
 Level 4
Overview
Print those for training/learning.
Variants
The Dwev keyboard layout comes in two variants:
- The standard disposition, which
- moves the numbers into a “num-pad” like disposition
- uses the cap-lock as a switch to level 5 and 6 (and turns the num-pad on)
- utilizes the top row for all deadkeys and european symbols (ç, è, Œ, IJ, …)
- The numeric disposition, which
- keeps the numbers at their standard position at the top row
- only uses 4 level, so keeps the default cap-lock key behaviour
- can’t be used to type non ANSI characters, so only support English
Why?
Like a lot of people, I only started to look into alternative keyboard layouts after suffering from RSI pains. My first attempt was learning bepo, the French variant of dvorak.
However, I quickly realized that apart from the odd email, 99% of my writing was English/coding, and it wasn’t fit for purpose.
I then switched to standard dvorak and soon after to programmer dvorak. While it was a huge progress over qwerty, I still had a few nagging issues, which I solved by forking into a variant I dubbed developer dvorak.
While it served me well for years, I still wasn’t feeling 100% comfortable. But I couldn’t quite put my finger on what were the pain points. Until one day I stumbled upon the workman layout. That was an eye-opener and led me to analyze more my typing movements. That nagging feeling I had been having was due to
- lateral movements, namely the center column keys stretching the indexes
- too much effort and stretching put on the right pinky finger
I briefly tried the workman layout, but almost immediately realized it didn’t go far enough to my taste in addressing those issues. And here began the journey into trying to create an alternative, and explore some concepts I wasn’t familiar with, like frequency of digrams, hand alternation, etc.
Statistics and heatmaps
You can play with various types of texts and see how it performs using Patrick Gillespie’s Keyboard Layout Analyzer. An example can be found at https://patorjk.com/keyboard-layout-analyzer/#/load/0rFQHszQ.
There are a few things to keep in mind when comparing with other keyboards, though: - The analyzer doesn’t differenciate between lateral and vertical distance, which is all the aim of Dwev - Only the “numeric” version can be tested, due to limitations in how keyboards are represented in the tool - As a result, the “fairer” metric to focus on is the heatmap tab
The layout .json definition can be found at https://gitlab.com/pm98zz-c/dwev/-/raw/main/https:/patorjk.com/dwev-num.json.
Installation
Grab the source from https://gitlab.com/pm98zz-c/dwev.
Linux
User installation
To install for your user only, copy the whole “linux/xkb” folder to $XDG_CONFIG_HOME.
In most cases, if unset, this would be $HOME/.config.
❯ tree .config/xkb
.config/xkb
├── rules
│   ├── evdev.lst
│   └── evdev.xml
└── symbols
 ├── dwev
 ├── dwew.xkb -> ./dwev
 └── num

3 directories, 5 files
You will need to logout of your session and login again.
The layout should then appear as “Dwev” under the “Other” section of your settings. It is referenced as “dwev” by xkeymap, etc.
System-wide installation (method 1)
To install for all users, copy (as root) the whole “linux/xkb” folder to /etc.
❯ tree /etc/xkb
/etc/xkb
├── rules
│   ├── evdev.lst
│   └── evdev.xml
└── symbols
    ├── dwev
    ├── dwew.xkb -> ./dwev
    └── num

3 directories, 5 files
You will need to reboot.
The layout should then appear as “Dwev” under the “Other” section of your settings. It is referenced as “dwev” by xkeymap, etc.
System-wide installation (method 2)
This should let you set the Dwev layout for the whole system, even at the LUKS encryption dialog at boot time.
As root, copy the linux/xkb/symbols/dwev file and rename it under /usr/share/X11/xkb/symbols/custom.
You will need to reboot.
The layout should then appear as “A user defined custom Layout” under the “Other” section of your settings. It is referenced as “custom” by xkeymap, etc.
NOTE: You can only have one “custom” layout installed using this technique.
Mac OS
User installation
To install for your user only, copy mac/Dwev.bundle to ~/Library/Keyboard Layouts.
After a reboot, it should appear under “System Preferences > Keyboard > Input Sources”
System-wide installation
To install for all users, copy mac/Dwev.bundle to /Library/Keyboard Layouts.
After a reboot, it should appear under “System Preferences > Keyboard > Input Sources”
External resources
Some external links that could be interesting for keyboard enthusiasts.
Layouts
- Anymak keyboard layout: https://github.com/rpnfan/Anymak A very promising layout, that shares a lot principles and similarities with dwev. I probably would not have created dwev, had it existed at the time.
- Colemak keyboard layout: https://colemak.com/
- Programmer Dvorak keyboard layout: https://www.kaufmann.no/roland/dvorak/
- Neo keyboard layout: https://www.neo-layout.org/
- Arno’s Engram keyboard layout: https://engram-layouts.xyz/
- Workman keyboard layout: https://workmanlayout.org/
Analysis
- Michael Capewell’s Keyboard Comparison Applet - stale: http://www.michaelcapewell.com/projects/keyboard/compare_applet.htm
- Patrick Gillespie’s Keyboard Layout Analyzer: https://patorjk.com/keyboard-layout-analyzer/
- There’s also a nice comparison at https://cyanophage.github.io/ although it’s a bit opaque in how it is built and what the criterias are. From https://github.com/cyanophage/cyanophage.github.io/
Learning/Trying
- Quickly try a keyboard layout: https://keyboard-layout-try-out.pages.dev
- Learn to type Dvorak (can be used to learn Dwev to a certain extent too): https://learn.dvorak.nl/ from Juerd Waalboer. In my opinion, the best way to learn to touch type.
System/tools
- XKB: https://gitlab.freedesktop.org/xkeyboard-config/xkeyboard-config
- Ukelele Keyboard Layout Editor for macOS: https://software.sil.org/ukelele
- Keyboard Layout Files Creator: https://github.com/39aldo39/klfc
- Microsoft Keyboard Layout Creator (MSKLC): https://www.microsoft.com/en-us/download/details.aspx?id=102134
- Kalamine Keyboard Layout Maker: https://github.com/OneDeadKey/kalamine
- AutoHotkey: https://www.autohotkey.com/
- Keyman: https://keyman.com/
- Kanata keyboard remapper: https://github.com/jtroo/kanata
What with the name?
It’s just a kind of portemanteau3 between “Dev” with the “W” added as kudos to the Workman keyboard layout, which was the inspiration to start the whole thing. It should probably be renamed the “Comfy Keyboard Layout”, “Comfortable” or something similar, given its primary aim. As you can guess, I’m not really a marketing person.
The letter Q requires a slight movement to the right from the pinky finger. There are only as many “home” keys, and something has got to give. I initially had placed the “J” there, as it is far less used than the “Q”. However, it was placing the “Q” next to “Z”, and operated by the left pinky finger. This made pressing “Ctrl+Q” an easy mistake to make when trying to “Ctrl+Z”, so the small compromise between comfort and practicality is worth it, in my opinion. ↩︎
You’ll notice there’s actually an extra dollar
$right to the “L”. While it is accessible through modifiers already, and not strictly needed, I added a direct key due to its prevalence in some programming languages. ↩︎Yes, that’s how I spell it ;D ↩︎